
Job loss. Illness. Civil unrest and crop failure. The possibilities for disruptions to your personal food supply are many and depressingly varied. It’s a wise move to plan ahead and set some food aside.
 Long-term food storage seems to be at the very heart of prepping, and as a result, there’s a bewildering amount of information out there on the topic. Having gotten started on this somewhat recently, I remember having a lot of basic questions. What are the best foods to stock up on? How often do I have to rotate my stores? Should I use #10 cans, canning jars, or mylar bags in buckets? And last but certainly not least, how can I do this without taking up absurd amounts of time and on a reasonably limited budget?
It’s taken me months, but I’ve answered these questions, and I thought I would share what I’ve found. I would have loved to find this post months ago. Fortunately for everyone reading this, you can avoid the research hole I’ve had to crawl into. Just read on. : )
What kind of food should I put aside?
If you’re looking for inexpensive food, you can’t beat rice. It’s a reasonably complete meal by itself, unlike flour, oats, or sugar, and it only requires boiling in a saucepan or even a billycan. If you’ve got lots of money with no other pressing use for it, by all means go to Amazon and order Mountain House freeze-dried meals in #10 cans (only be advised that you need to halve their servings—if they say you’re getting ten servings, it’s really only five). It will cost a LOT more than what I’m about to show you, but you’ll be finished in one fell swoop.
What should I use to store my food?
One option for long-term storage is to find the closest LDS (Mormon) bulk supply store (https://providentliving.churchofjesuschrist.org/self-reliance/home-storage-centers?lang=eng) and stock up on #10 cans. Or you could try what a lot of the manly types do and stash your rice away in mylar bags and buckets. I decided against both of these alternatives because it puts the food in something that people are disinclined to use. I watched several YouTube videos where people said they had rice in buckets when the power outage or health crisis or hurricane warning came, and the buckets never got used. A five-gallon bucket of rice is heavy. If you have any other alternative, you’re not going to want to haul that thing around, not even to the kitchen. And if there’s an emergency, nobody seems to load them into their car. Likewise, people seem to want to save the #10 cans “for later.” Opening them in an irrevocable thing, so the food reserves don’t seem to get used, even when it’s appropriate.
So, I went with canning jars. It’s what I have the most experience with anyway, and besides, they’re more aesthetically pleasing than the alternatives. And they’re a good long-term, everyday choice. It’s easy to pull a single jar from stores, take it to the kitchen, open it and use it. And when you’re done, you can refill it.
And the most important consideration:
When putting away food you need to count calories–don’t trust anyone’s definition of a “serving.” If you do, you’ll end up with a bunch of four-hundred calorie meals. It’s a somewhat surreal experience, since I’m used to perpetual dieting, and I tend to think of calories as something you minimize. It’s strange to flip my thinking around. But you should aim for a 2,000 calorie diet per person per day. You may not eat that much, but lots of people do, and this is an area where you want to err on the side of too much rather than too little.
Option 1: Rice alone
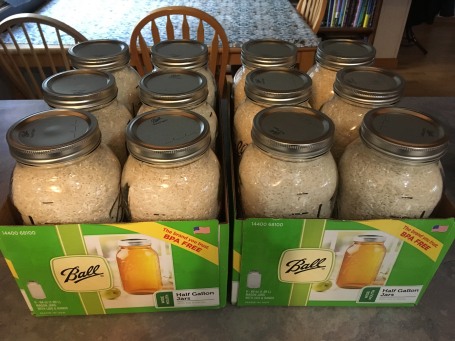
You’ll need forty pounds of white rice (about $17-20, depending on the size of the bag you choose) to fill a dozen canning jars (about $24 at Walmart). Don’t get brown rice—it goes bad in only a few years. Forty pounds should work out perfectly, but you can get an extra one-pound bag just to make sure you have enough. At 1600 calories per pound, forty pounds of rice comes out to 64,000 calories, which is about 2,100 calories per day for thirty days.
But it’s a little more complicated than simply opening the jars and pouring the rice in. You could do it that way, but apparently there’s a little weevil that lives in rice, and if you don’t deep-freeze it for a week or expose it to heat, you may open your rice later and find it’s inedible, which defeats the whole purpose. (Another pitfall of storing rice in buckets.) Since I lack a deep freezer, I went with oven canning.
Oven canning is pretty simple. You don’t have to worry about being absolutely sterile (only pressure canning will accomplish that)—clean is good enough. In addition to rice and jars, I use scissors, a canning funnel, and a stack of at least 15 clean rags.

- Wash the jars and lids. Presumably they’re already clean since they’re new, but we’re being meticulous here. Once they’re washed, put them in a 220 degree oven upside down for about ten minutes until they’re dry. Or run them through the dishwasher—just make sure they’re absolutely dry before you put anything in them. Moldy food is not our goal.
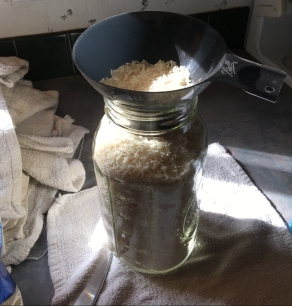 Fill the jars on top of a clean rag. Overfill, like in my photo. Once you lift out the funnel, you’re going to bang the bottom of the jar on the counter (hence the rag underneath—you want to cushion the jar) until the rice settles to just above the “neck,” the place where the spirals start so you can screw on the lid. Repeat until all the jars are full.
- Leave the lids on the counter on their clean rag, and put the open jars in the oven at about 220 degrees for 50 minutes. My oven is a pretty standard size, and twelve jars fit just about perfectly.
- Take the hot jars out of the oven one at a time, wipe the rim of the jar to make sure it’s clean, and immediately put the lid on. Screw the outer ring only to finger tight—don’t over-tighten. Suction is what will keep the lid on—not the outer ring. Some people even remove the rings afterward. (I don’t—I figure it can help protect the glass rim from chipping.)
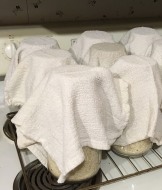 Before you take another jar out, cover the first jar with a rag, and put it on top of the stove to cool (I put my second oven rack on top of the stove for this). Glass doesn’t like rapid temperature changes, so giving it a way to cool off gradually will keep your jars from cracking. Repeat until all the jars are full.
If you’re not already comfortable with canning, I suggest watching a YouTube video on the process. This one is pretty good, even though I think she goes a bit overboard: https://www.youtube.com/watch?v=aiSxDNzMwSs&t=69s. I wouldn’t bother sterilizing the jars in a vinegar bath. There is no way you can keep them completely sterile with the amount of germs that exist in the air—only pressure canning will accomplish that. (Think of all the dust motes you can see in a single sunbeam.) Fortunately, clean is good enough for our purposes.
As the jars cool, you’ll start to hear the happy clinking sounds the lids make when they suck down and create a vacuum seal. Then just load them back into their boxes for storage. I also suggest padding them with rags. That way if you ever need to take them with you, they should transport okay.
You now have over 2100 calories per day for 30 days, it cost you less than $45 (in American money, using 2020 prices), and it will last you 30 years. Do this for every member of your family (including dogs, although that’s relative to their body weight: a Chihuahua won’t eat as much as a German Shepherd), and your most basic needs are addressed. Dry dog food only keeps for about a year, and cans are heavy, expensive, and only last for a couple of years. If it’s an emergency, your dog can and will eventually eat rice.
This is the simplest, cheapest solution I’ve been able to find, and believe me, I have really looked. I have weaknesses like everyone else, but research is actually an area of strength for me.
Option 2: more appealing rice

If you ever have to rely solely on your food stash, you’re going to get very tired of plain white rice. While this is almost the definition of a first world problem, with only a little more foresight you can cushion the blow a bit. Buy some bullion cubes. In their plastic containers, I’ve personally kept and used these things seven years past the best buy date with no ill effects, so they’re good for about eight years overall. I don’t remember exactly what these things cost, but they weren’t very expensive.
Option 3: more hassle, more expensive, but definitely healthier
Again, this is somewhat of a first world problem, but going through a complete diet change can be hard on your body. People can get “bound up” pretty easily, and nobody needs that. So, if you’ve got the time, money, and inclination, this is what I recommend.
I planned on eating a pound of rice per day (1600 calories), which gave me forty days. So, I “owed” myself 400 calories per day for 40 days, or 16,000 calories. This is my solution, but don’t feel like you have to exactly replicate my food choices. Treat what I’m doing here as a template, to be adjusted as necessary to fit your needs.
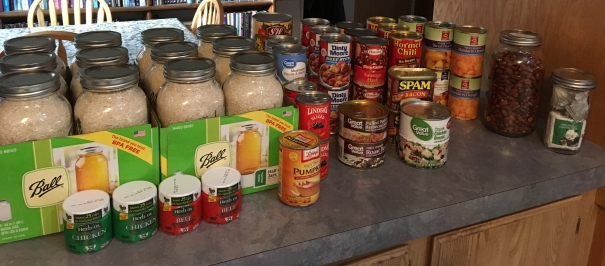
It’s easiest if you eat meat because those cans have the most compact, cheapest calories. The 18 cans of chili, hash and beef stew came to 10,200 calories by themselves. The six cans of meat added another 3,400.
The fruit and vegetables are there mostly because I refuse to deal with an emergency without them, and it’s better for bowels. They don’t add a lot of calories, and in the case of the vegetables, hardly any vitamins either, with the exception of the pumpkin. That one little can has 1250% of your RDA of vitamin A, and I like pumpkin and squash in soup. Honestly, the mushrooms are there just because I want them. They have hardly any calories or vitamins to speak of. Overall, my 17 cans of fruit and veg clocked in at only 3,000 calories.
The nuts are actually a bonus, but you’ll probably need to count on them if you don’t eat meat, and they require no cooking at all. My jar of almonds has over 6,000 calories. Peanuts would have been cheaper, but unfortunately, I can’t stand them.
I also wanted to quickly address the jar of tea. An emergency is not a good time to try to go cold turkey on caffeine. “Real” coffee doesn’t keep well, and you need power to run a coffee pot. Tea is cheap and lasts like rice if you pack it in jars (don’t put it in the oven—just cram the jar full), so it’s the easiest solution. If you can’t stand tea, instant coffee also lasts well, at least a decade. You can improve the taste by adding an instant cocoa packet to make a mocha. Stuff the cocoa in jars, and only keep as many as you’ll use over the next two years.
The advantages of this plan are easy to see—this diet is far more appealing. However, it also costs more. I didn’t save receipts, but going with a rough price breakdown by memory, this selection (not including nuts) costs around $80, almost double that of the rice. The meat-based stuff alone will set you back around $52. The fruit and veg will cost around $26. So, if your budget is tight, I’d go for the rice plus bullion, just so you have something. You can always improve it over time.
Another disadvantage is shelf life. Sure, there are YouTube videos of people eating canned food from the 60s, but I wouldn’t. All this stuff, even the nuts, will last for at least two years (the chili, hash, and beef stew are good for three). What I recommend is to clean out your food cupboard and stock up on stuff you’ll actually eat. My cupboard had turned into a food catch-all, so I took the time to take everything out, throw away the expired stuff (a depressing task), and reorganize the whole thing so that it’s a well-thought-out resource. Rotate by putting new jars in the back, and the system should maintain itself.
Also, store the rice someplace that’s NOT an attic—heat destroys food. Inside your house is best, but if you can’t manage that, pick a bottom shelf in your garage or shed.
A few final considerations…
I recommend stashing an extra bottle or two of vitamins in your medicine cabinet. Make sure you rotate it; they don’t have much shelf life. Also, maintain a generous supply of all necessary medications (I keep a stash of Emergen-C in quart canning jars, as well as pain relievers and cold medicines), and mind the expiration dates on those as well.
You can also go much further with food storage than what I’ve outlined here, but it gets progressively more difficult. If I was going to add only a single food to this plan, I’d put aside as much complete pancake mix (just add water) as you’ll go through every two years. Pour it in jars and keep it in the cupboard—no oven canning. (Oven canning isn’t a good choice for anything containing dried milk.) Real maple syrup is supposed to last forever. But you’ll also have to add a can of Crisco to your stores, and that only lasts a couple of years.
It’s actually better if you vacuum seal jars that don’t go in the oven. But to do this requires a Food Saver with jar attachments, and that will cost over a hundred dollars. If you’re going to use up the food within a couple of years, this is unnecessary. But if you’re going to set aside raisins for the next decade or so, you need to bite the financial bullet so you can store your food properly. There are lots of YouTube videos available on how to vacuum can.
Beans are the natural companion to rice, but unfortunately, I’m not a big fan. However, I did stash away a half-dozen half-gallon jars. For mine, I just poured them into clean jars and vacuum sealed them, but some people recommend oven canning these as well. If you want to set aside beans, I’d recommend counting on only a ten-year shelf life, the same as oats and instant potatoes. And remember that unless you’re putting them in a soup to simmer for hours, you need to soak beans overnight to make them edible.
You can also put away packets of gravy mix and dried soup. Stuff them in jars and only buy what will fit in your cupboard and get used over the next two years.
I’ve also oven canned oats and instant potatoes, using the same process I outlined above for rice, but these things require dried milk, which is pricey. Instant potatoes also require a fat source. My butter-flavored Crisco will be good for two years, and then I’ll have to donate it. Moving forward, I’d rather learn to grow potatoes and pressure can them, but I did invest in a half-dozen jars of potato flakes.
US government sites recommend having an emergency supply of two weeks of food per person. I think forty days is a much better solution, and if you can at all afford it, an even better plan is to double that. (If not, just stash away a month’s worth of rice.) And okay, prepping took all my disposable income plus a bit for the last six months (I even gave prepper gifts for Christmas). But in a widespread emergency, are you really going to turn away your neighbor with the cute little four-year-old, the one who always waves and asks to pet your dog? Are you going to tell your extended family to go starve? I don’t advertise the fact that I have food stores, but since I can put more aside, I have. If I’m going to try to survive, I want to do it as me.
I decided when I embarked on prepping that everything I do has to have some sort of benefit right now. I was actually willing to exclude food storage from that standard, but when I look at the food I’ve set aside, it turns out I feel pretty good about this whole thing. I am Not Blowing It. I Have My Act Together in this important area, and that put a a smile on my face and some joy in my heart.
Go ahead—try it and see. Happy prepping, everyone. : )
Share this:

Avid writer and reader of Faerie tales and noblebright fantasy.


Good ideas. This is something we are thinking about, especially as nutty as California is getting. Thanks.
LikeLiked by 3 people
It was my pleasure, Jacqui. It really seems like our current government is trying to ruin the state. I keep telling myself that this too must pass.
LikeLiked by 2 people
Very nicely done. Informative and easy to understand.
LikeLiked by 2 people
Thanks so much, Dan! : )
LikeLiked by 1 person
Great survival info, Cathleen! At our house we’re well-prepared with lots of choice staples and plenty of water stored. Sharing, so others can get in on these super secrets. Thanks!
LikeLiked by 2 people
So glad to hear that you’re all stocked up, although I’m not surprised. Water is something a lot of people overlook; I’ll be covering that in a future post. Thanks for sharing. ❤
LikeLiked by 2 people
Hugs & Happy Week! ❤ xx
LikeLiked by 1 person
Thank you for a thorough plan that we can adopt for our safety. You’ve really researched this carefully – thank you, Cathleen.
LikeLiked by 1 person
I’m glad it seems helpful. : ) The hours of watching YouTube posts with titles like “13 foods that keep forever” were not in vain.
LikeLiked by 1 person
Great overview.
LikeLiked by 1 person
I’m so glad you found it useful. : )
LikeLiked by 1 person
Wow. That’s some solid work. Thanks for sharing. I will have to bookmark this post and refer to it every now and again.
LikeLiked by 1 person
It’s a good idea to build up a food stash, you know, just in case. Hope it comes in handy. : )
LikeLiked by 1 person